You can make your personal additions to the repertory with our Repertory Editor.
The Repertory Editor allows you to create your own rubrics and add remedies to rubrics. You can also create new remedies that are not yet present in the current repertory.
You can add personal notes to rubrics, to be displayed with the rubric.
Each of these functions will be explained below.
The functions of the Repertory Editor are accesible through menu options in the menu bar, as well as menu options in the popup menus on rubrics and remedies.
For a few quick additions, these are very effective. In case you want to make multiple additions, you can open the Repertory editor assistant. We will explain the assistant after we discussed the different options.
To add rubrics, first open the Book module in the chapter where you want to create your rubric.
You now have the possibility to create a new rubric. (Menu option Book / Edit / Add rubric, popup menu option Edit / Add rubric).
To add a sub rubric to an existing rubric, first select the rubric by clicking on it, then create the sub rubric.
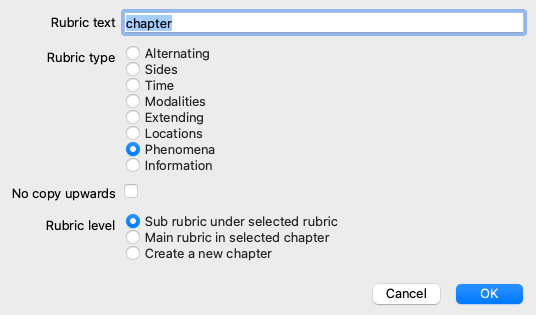
A dialog will open.
Please select the appropriate rubric type. You do not have to do this, but it will make your new rubric behave like other rubrics in the repertory. The rubric type is also used by the Analysis module, to better value the remedies in the rubric.
The option No copy upwards should be checked for a sub rubric which has an opposite meaning than the higher rubric. You commonly use this for a sub rubric that indicates an amelioration of a given symptom. An amelioration reverses the meaning of the upper rubric.
Checking this option will disable the automatic copying of new remedies to higher and more generic rubrics.
It is also used by the Analysis module, to see how a remedy occurs in related rubrics.
After creation, you can always modify rubric text and type. (Menu option Book / Edit / Edit rubric, popup menu option Edit / Edit rubric).
Note that you can only edit a rubric that has been created by you, not the original repertory rubrics.
You can remove a rubric that you have added. (Menu option Book / Edit / Remove rubric, popup menu option Edit / Remove rubric).
Note that you can only remove a rubric if it no longer contains any remedies or sub rubrics. This is to prevent accidental removal of valuable information.
To add a remedy to a rubric, first open the Book module and select the rubric to which you want to add a remedy.
You now have the possibility to add a remedy to that rubric. (Menu option Book / Edit / Add remedy, popup menu option Edit / Add remedy).
A dialog will open.
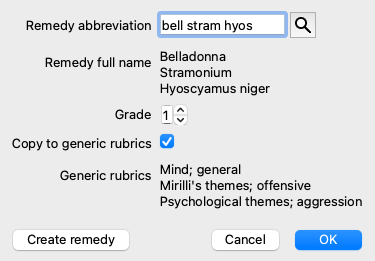
You can enter one or more remedy abbreviations. The corresponding full remedy names will be displayed below the field. The OK button will be disabled if you entered an incorrect abbreviation.
If the option Copy to generic rubrics is selected, the remedies will automatically be added to rubrics that are more generic than the selected rubric. These rubrics are listed below that option.
In case you want to add a remedy that does not already exist in the repertory, you can create it with button Create remedy.
You will be prompted for a remedy abbreviation and a full name. The remedy abbreviation you wish to create must be an abbreviation that does not already exist in the standard repertory.
After creating your new remedy, you can always change its abbreviation or name later. (Menu option Book / Edit / Edit remedy, popup menu option Edit / Edit remedy).
If you want to increase the grade of a remedy in the standard repertory, just add the remedy with a higher grade. Your higher grade will become more important than the original grade.
You can remove a remedy addition. (Menu option Book / Edit / Remove remedy, popup menu option Edit / Remove remedy). Note that you can only remove a remedy that has been added by you. Removing a remedy only removes you as the author. If there are remaining other authors for the same remedy, the remedy itself will not be removed from the repertory.
You can also remove all your remedy additions in a rubric. (Menu option Book / Edit / Remove all remedies, popup menu option Edit / Remove all remedies).
Instead of quickly adding a number of remedies with the selected grade, it is also possible to explicitly specify the grades of individual remedies.
There are a few ways to override the selected default remedy grade.
The following examples show how to add remedy bell with grade 2, cham with grade 3, and dig with grade 4.
The latter method is the format used when copying a rubric and its remedies to the clipboard. This mechanism enables you to quickly copy the remedies from another rubric. On the other rubric, copy rubric and remedies and then paste into the remedies field. (Menu option Book / Copy / Copy rubric and remedies, popup menu option Copy / Copy rubric and remedies).
These additional mechanisms to specify remedy grades can be extremely powerful when importing remedies that you want to copy from external sources.
By default, all remedies you add to the repertory are labeled with you as author. For your personal repertory additions, this is most likely what you want. If you are adding remedies from other source material, like books or seminars, you might want to specify the author explicitly.
You can add a new author. (Menu option Book / Edit / Source / Create new source, popup menu option Edit / Source / Create new source).
You can select one of the authors. (Menu option Book / Edit / Source / Select source, popup menu option Edit / Source / Select source). After selecting an author, this will automatically become the author for new remedy additions.
You can edit the details of the selected author. (Menu option Book / Edit / Source / Edit source information, popup menu option Edit / Source / Edit source information).
When you activate the toolbar button ![]() , your personal additions will be highlighted with a light green color. This way, you will be able to quickly see which remedies have been added by you.
, your personal additions will be highlighted with a light green color. This way, you will be able to quickly see which remedies have been added by you.
It is also possible to see only your personal additions, without all the other remedies. To do this, you can create a personal repertory filter, selecting yourself as the only author.
You can add a personal note to any rubric. (Menu option Book / Edit / Add rubric note, popup menu option Edit / Add rubric note).
The presence of a note will be shown by a ![]() following the rubric text.
following the rubric text.
To see the note, just move your mouse over the rubric text, or double click on the ![]() image.
image.
You can edit or remove your personal notes. (Menu option Book / Edit / Edit rubric notes, popup menu option Edit / Edit rubric notes). A dialog will open, which will need no further explanation.
Just like you can add notes to a rubric, you can also add notes to individual remedies. There are additional functions for that. (Menu option Book / Edit / Add remedy note, popup menu option Edit / Add remedy note).
A cross references is a reference from one rubric to another rubric. To create a cross reference, you first have to select the origin rubric, then the destination rubric.
Select the rubric by clicking on it, then mark it as the origin rubric. (Menu option Book / Edit / Cross Reference / Select rubric as cross reference origin, popup menu option Edit / Cross Reference / Select rubric as cross reference origin).
Next, select the destination rubric and mark it. (Menu option Book / Edit / Cross Reference / Select rubric as cross reference destination, popup menu option Edit / Cross Reference / Select rubric as cross reference destination).
A dialog will open, showing you the origin rubric and the destination rubric, with a button to add the cross reference.
To remove a cross reference, follow the same procedure. The dialog will then show a button to remove the cross reference.
You can also simply click on the cross reference, and then remove it. (Menu option Book / Edit / Cross Reference / Remove cross reference, popup menu option Edit / Cross Reference / Remove cross reference).
Note that you can only create cross references inside a single repertory. You cannot create cross references from a rubric in one repertory to a rubric in another repertory.
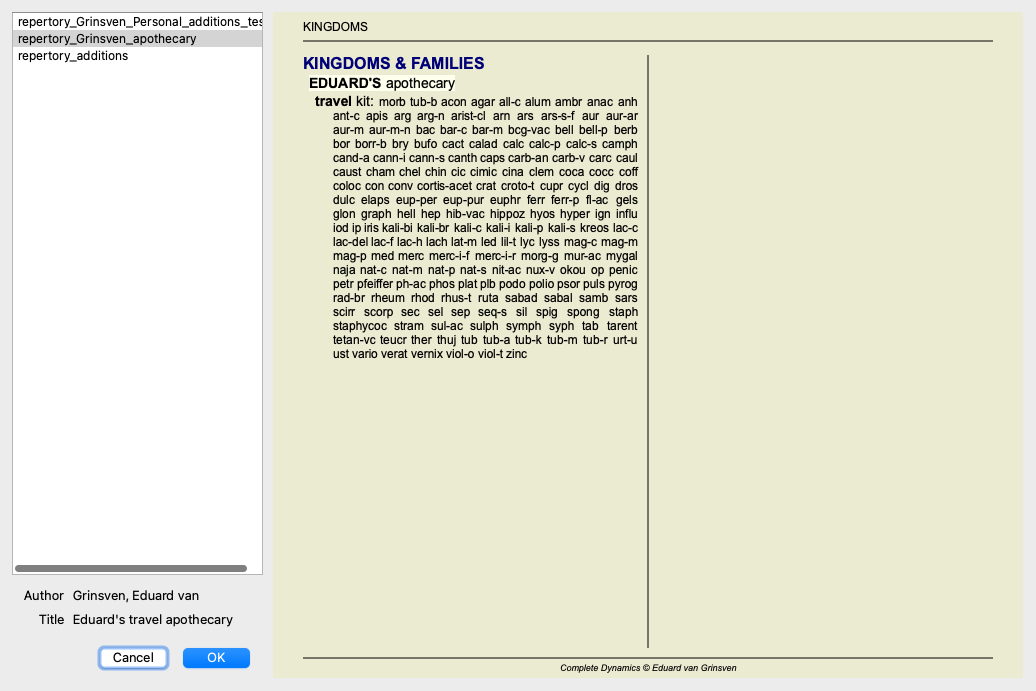
Your personal repertory additions are by default stored in a file called repertory_additions.rep.
This file is stored in the Complete Dynamics folder, under your Documents folder.
It is possible to create multiple repertory files. Using multiple repertory files has several advantages.
To share a collection of repertory additions with another person, all you need to do is give the other person a copy of your repertory file. You can of course also put your additions file somewhere on the internet, so everybody can use it.
The other person can then place the file in the Complete Dynamics folder, and start Complete Dynamics. Your repertory additions will then automatically appear in the repertory.
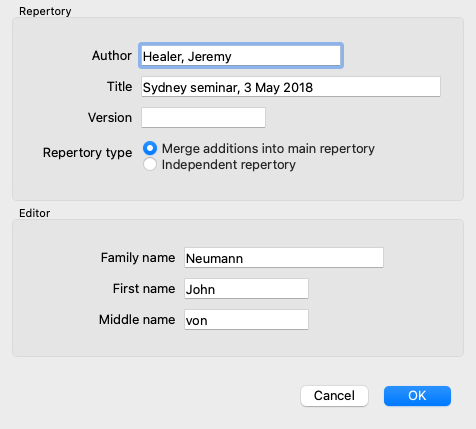
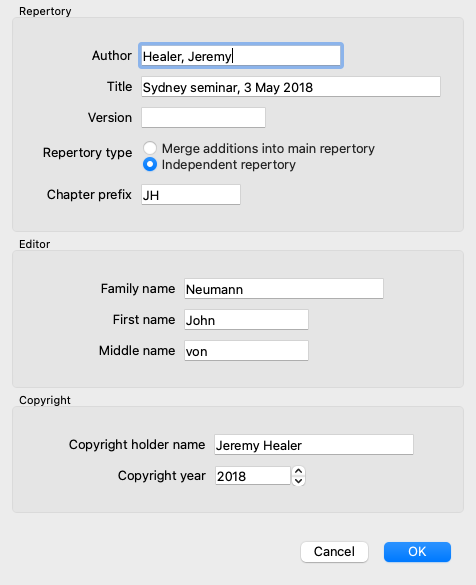
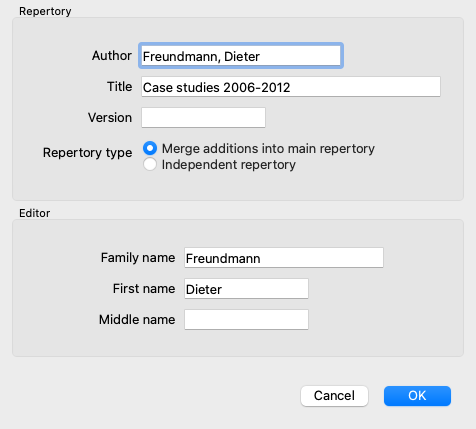
You can easily create a new repertory file. (Menu option Book / Edit / Repertory file / Create new repertory file, popup menu option Edit / Repertory file / Create new repertory file).
A dialog will appear, allowing you to specify the details of your repertory additions.
In the section Repertory, you can enter information about the origin of the repertory additions.
Author is the person whom the information originates from. By default, your name is already filled in. If the information comes from another person, use the other person's name (for instance: Kent, James Tyler).
Title should give a description that identifies the origin of the information.
In the section Editor, enter the details of the person who edited the repertory additions. By default, your name is filled in. In some situations, when editorial work is continued by another person, it can be necessary to change this information.
To create a stand-alone repertory, which will exist alongside the main repertory, select option Repertory type: Independent repertory.
Some extra fields appear, which are specific to independent repertories.
You can change the information about a repertory file. (Menu option Book / Edit / Repertory file / Edit repertory file information, popup menu option Edit / Repertory file / Edit repertory file information).
By default, any additions you make are stored in the file called repertory_additions.rep.
If you want to work with one of the other existing files, you first have to select that file. (Menu option Book / Edit / Repertory file / Select repertory file, popup menu option Edit / Repertory file / Select repertory file).
A dialog opens, showing the available repertory files.
In the list on the left side, you can select a repertory file. The right side will then show a preview of which repertory additions are in the file.
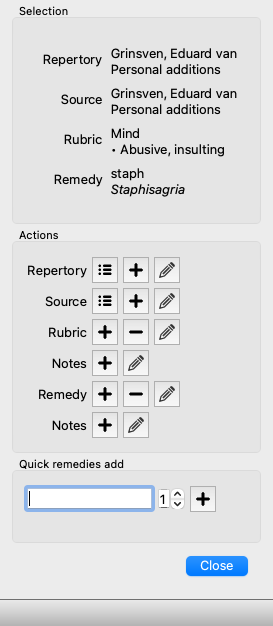
In case you want to make multiple repertory additions, it can be convenient to use the Repertory editor assistant. (Menu option Book / Edit / Open repertory editor Assistant, popup menu option Edit / Open repertory editor Assistant).
The section Selection indicates which rubric has been selected in the Book module, and when applicable which remedy has been clicked.
The section Actions contains buttons for all the functions that you would otherwise access from a menu.
The section Quick remedies add allows you to quickly add a number of remedies to the selected rubric. This function requires all remedy abbreviations to be correct. The remedies will automatically be added to all more generic rubrics. See Adding remedies (above) for more information.
With the Repertory Importer module, you can import repertory entries in bulk, from an external file. The Repertory Importer recognizes several data formats, which are described below.
Before starting the Importer, you must have created a Repertory Additions file, and select it. (Menu option Book / Edit / Repertory file / Select repertory file, popup menu option Edit / Repertory file / Select repertory file).
After you have selected the repertory file in which you wish to import the external data, you can start the Repertory Importer. (Menu option Book / Edit / Repertory file / Import from an external file, popup menu option Edit / Repertory file / Import from an external file).
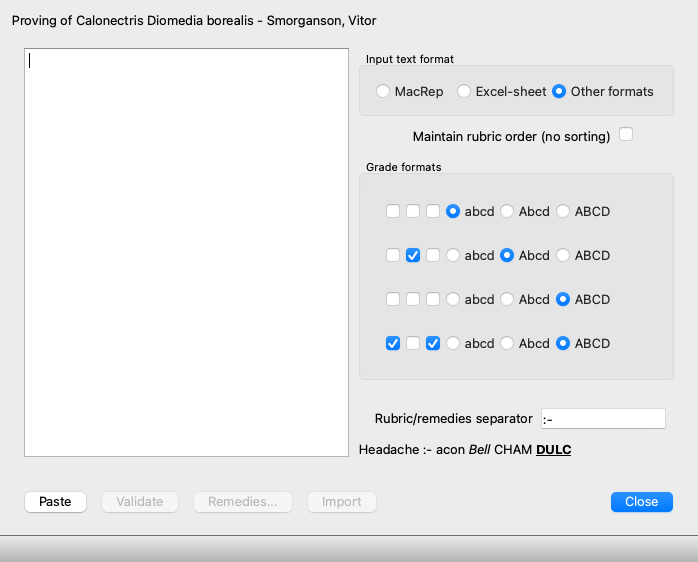
The Importer module now opens.
The first step is defining the input text format. Each format is defined is a separate paragraph below. For each format, there are example files. You can find these files in folder Documents / Complete Dynamics / Examples.
All the example files have different formats, but they define exactly the same repertory rubrics and remedies.
The next step is importing the text into the Repertory Importer.
The input text that you want to import, must conform to the defined format. In the file, select all the text and copy it to the clipboard.
Then, in the Repertory Importer, press button Paste. The copied text will appear in the large white space. If there is a problem with the text, change it in the original document and copy/paste again.
After importing the text, press the Validate button to do some first tests. If any errors are found, these must first be corrected before you can continue.
In case your repertory contains remedy abbreviations that are not present in the Complete Repertory, you can now define which remedies they are. You define the unknown remedies using the Remedies... button.
Once there are no more errors and all remedies are correctly defined, you can import the repertory with the Import button. Then, close the Repertory Importer with the Close button.
Please note that importing will remove the entire contents that was previously in the repertory file.
This format is used by MacRepertory, to define additions. Selecting this format does not require any other settings to be defined.
Please look at the examples for details. With the examples, there is also a file that gives more information about the file formats.
In this format, the first columns define the rubrics. The last column holds the remedies.
Just look at the examples, it is easy.
In this format, the remedy grades are defined by the text styles.
You can also define the text fragment that separates the rubric label from the remedies.
For each remedy grade, you can define the format. Below the settings, you see an example of what the formatted text looks like with the selected settings.
The rubric hierarchy is defined by indenting the text. This can be done in diffent ways.
There are example files for each indentation method.